
Random Scenario Generator
Scenario Briefing
Battlefield Archetype
Decimated Ruins
Battles are frequently fought to capture cities, towns and villages located between, or just behind, the trench lines of the opposing Warbands. The constant warfare quickly reduces once-proud buildings to ruins, amongst which Warbands fight each other in brutal short-ranged engagements. Tactical and strategic success can be measured by who takes control of the ruined buildings, piles of rubble and wrecked vehicles that litter the shattered landscape.
Decimated Ruins Terrain Pieces
The players roll-off, and the winner sets up the terrain for the game. The terrain pieces for a game taking place in Decimated Ruins must be chosen from the following list:
- Ruined Buildings
- Ruined Corners
- Areas of Dangerous Terrain (barbed wire, swampy ground, etc)
- Area of Difficult Terrain (craters, rubble, fallen trees, etc)
- Landmarks (statues, shrines, altars, etc)
Number of Terrain Pieces
You will need at least 6 ruined buildings and at least 2 pieces of each other sort of terrain. Count pieces that are more than 8" across or more than 8" long as being 2 pieces of terrain towards this number rather than only 1.
Terrain Setup
Any ruins that are going to be used for the game must be set up first. The first ruined building or corner can be set up anywhere on the Battlefield. Each subsequent ruined building or corner must be placed between 3" and 9" away from any other ruined building or corner. After all of the ruins have been set up, any other terrain can be added to the Battlefield. Terrain apart from ruins can be set up anywhere on the Battlefield that is at least 3" away from any other terrain pieces.
Victory Conditions
Breakthrough
Each side has an extraction point. They are directly opposite each other, on the edge of the battlefield at the centre of the opponent's Deployment Zone. If a model finishes a move in contact with its extraction point, it is immediately removed from the battlefield. Models are also immediately extracted if they move into contact with an enemy model that is within 1" of their extraction point. Note that you cannot choose for a model to not be extracted.
A player wins this scenario immediately if the opposing Warband flees. Otherwise, the player with more Victory Points at the end of the game is the winner.
- Each player scores VPs for friendly models that were extracted equal to the model's Cost, divided by 10 if it has a Cost in , or by 3 if it has a Cost in (rounding fractions up). Include the model's Battlekit, Glory Items, and any other upgrades in its Cost. If a model has items worth both and , work out each separately. For example, a model that had a total Cost of 100 and 6 would be worth 100/10 = 10 VPS, plus 6/3 = 2VPs, for a total of 12VPs.
- At the end of the game each player scores 10 VP for each Glorious Deed they completed.
Game Length
Roll a D6 at the end of the fifth Turn. On a 1 or 2, the game ends immediately. On a 3 or more, the game will end at the end of the sixth Turn.Deployment
Fog of War
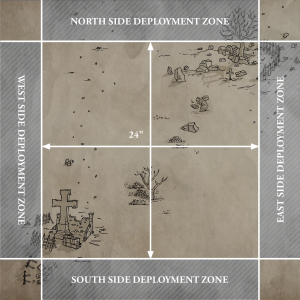
The players roll-off. The winner of the roll-off chooses whether the West or East Deployment Zone will be theirs. The players must then split their Warbands into two groups of models. The first group is the starting group, and the second group is their reinforcements. There must be more models in the starting group, and any models mounted on bases of 40mm or larger must be part of the starting group.
The players then alternate deploying their models in their starting group one at a time, starting with the player who has more models in their Warband (roll-off if both players have the same number of models). Models must be set up wholly within their own Deployment Zone. Infiltrators that are part of the starting group can deploy normally or by using their special deployment rules.
In the first Turn, the players must Activate the models from their reinforcements group, as well as the models that were deployed at the start of the battle (the reinforcements and previously deployed models can be Activated in any order). When they Activate a reinforcement, they must roll a D6 and refer to the Deployment Zone chart below to see where the model is deployed. The model must be deployed wholly within the Deployment Zone and in contact with the edge of the battlefield, and more than 1" away from any enemy models, even if it is an Infiltrator. The player can then carry out the rest of the model's Activation normally. Note that both players must Activate all of the models in their reinforcement group and they cannot choose to hold any back.
| D6 | Deployment Zone |
|---|---|
| 1 | The opposing player chooses the Deployment Zone. |
| 2 | The model is deployed in the Northern Deployment Zone. |
| 3 | The model is deployed in the Eastern Deployment Zone. |
| 4 | The model is deployed in the Southern Deployment Zone. |
| 5 | The model is deployed in the Western Deployment Zone. |
| 6 | The player chooses which Deployment Zone is used. |
Infiltrators can deploy normally or by using their special deployment rules.